Send Audience Data to Destinations
Engage Foundations requires a Business tier account and includes Unify.
See the available plans, or contact Support.
With the help of sources and destinations in Segment’s catalog, you can create and send audiences and computed traits to third-party services.
Segment’s Connections pipeline first collects and sends events from your source to your destination. Built on top of Connections, Engage then uses the same source events to let you create audiences and computed traits within Segment. You can then send the audience or computed trait you’ve built to your destination(s).
Because Engage only sends audiences and computed traits to destinations, it doesn’t replace a standard event pipeline. Connect a source directly to a destination if you want the destination to receive all events that Segment gathers.
Connect your audience to a destination
Once you’ve previewed your audience, you can choose to connect it to a destination or keep the audience in Segment and export it as a CSV file download.
When you create an audience, Segment starts syncing your audience to the destinations you selected. Audiences are either sent to destinations as a boolean user-property or a user-list, depending on what the destination supports. Read more about supported destinations in the Engage documentation.
For account-level audiences, you can send either a Group call and/or Identify call. Group calls send one event per account, whereas Identify calls send an Identify call for each user in the account. This means that even if a user hasn’t performed an event, Segment will still set the account-level computed trait on that user.
Because most marketing tools are still based at the user level, you’ll usually want to map this account-level trait onto each user within an account. See Account-level Audiences for more information.
When you connect a new destination to an existing audience, Engage will backfill historical data for that audience to the new destination.
Follow these steps to connect an audience to a destination:
- Navigate to Engage > Audiences, then select the audience you want to connect.
- From the audience’s overview page, click + Add destination.
- Select the destination you want to connect to, then click Add destination.
- Segment then begins its initial sync to the destination.
View connected destinations
You can view a list of an audience’s connected destinations in the destination list table of the audience overview tab.
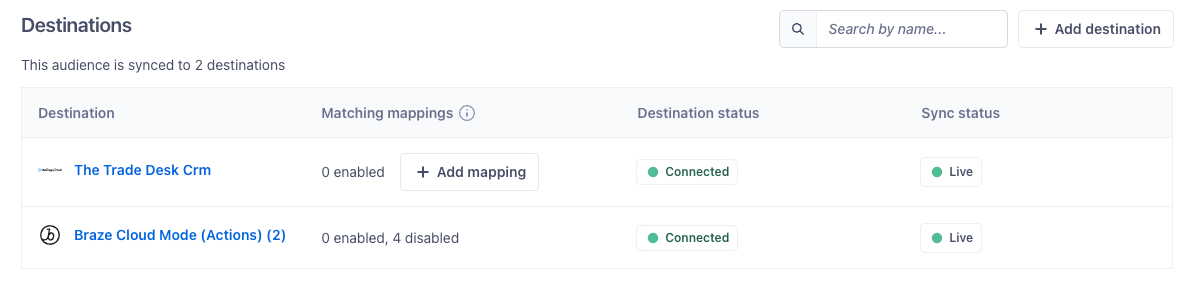
The Destinations table contains information about the destination’s matching mappings, status, and sync status.
Matching mappings
Actions destinations have mappings that can receive granular data from your audience. The Matching mappings column shows the number of mappings that match the data coming from the audience, as well as the number of enabled and disabled mappings. See Working with mappings for more information.
The Matching mappings column will show Not applicable for classic destinations.
Status columns
The Destination status column shows Connected, Disconnected, or Disabled:
Connectedindicates that the destination is enabled and receiving data from the audience.Disconnectedmeans that either the destination is disabled or the audience isn’t sending it data.Disabledmeans that the destination is disabled and the audience isn’t sending it data.
The Sync status column shows the current compute status between the audience and connected destination.
Working with mappings
You can add and access mappings within your audience’s connected destination by following these steps:
- Navigate to Engage > Audiences.
- From the Destinations list, click the destination you want to work with, or click +Add mapping.
- In the destination’s side panel, click Matching mappings.
- In the Add Mapping popup, select the mapping that you want to add.
- Segment then opens the destination’s mappings tab. Add the mapping(s) you want, then click Save.
Segment then returns you to the audience’s destination side panel, which shows your new mapping(s).
This page was last modified: 14 May 2024
Need support?
Questions? Problems? Need more info? Contact Segment Support for assistance!